AWS CloudFormation
Estimated time: < 60 minutes
Overview
Welcome to the Sublime Platform self-managed AWS deployment!
This deployment leverages AWS CloudFormation to automatically create resources and set up the Sublime Platform in your own AWS account.
GovCloud deployments
AWS GovCloud deployments have prerequisite steps that are described here! You must complete these steps before moving forward with the steps listed below.
Requirements
-
Admin permissions
A user with ~Admin permissions is required in order to deploy the stack and create the resources described below. Resources used are subject to change in the future, which is why we currently recommend Admin permissions (and an isolated AWS account, mentioned below). -
Dedicated AWS account
We recommend deploying the Platform in an isolated AWS account. This reduces the risk of errors, such as hitting AWS service resource limits, and overall makes things simpler to manage.
Setup
To deploy the Stack, press one of the following region-specific deploy buttons, and click through the AWS web GUI console.
Use a dedicated AWS account
We recommend deploying the Platform in an isolated AWS account.
This reduces the risk of errors, such as hitting AWS service resource limits, and overall makes things simpler to manage.
Deployment can take 40-60 minutes. CF templates are region specific, do not change your region in the console after following a link.
us-east-2 (Ohio) deployment - 
us-west-2 (Oregon) deployment -
eu-west-1 (Ireland) deployment -
eu-west-2 (London) deployment -
eu-central-2 (Zurich) deployment -
eu-north-1 (Stockholm) deployment -
ap-southeast-2 (Sydney) deployment -
us-gov-west-1 (US GovCloud West, requires GovCloud account) deployment -
us-east-1 (N. Virginia, not recommended, please reach out to Sublime for details) deployment -
us-west-1 (California, not recommended, please reach out to Sublime for details) deployment -
ca-central-1 (Canada, not recommended, please reach out to Sublime for details) deployment -
The default parameters are appropriate for many organizations, but if you have less than 4,000 mailboxes you may change the dbsizeparam to m6gXLarge1TB.
If you have more than 30,000 mailboxes, start with a dbsizeparam of m6g4XLarge4TB and a redissizeparam of cache.t3.medium. For organizations over 100,000 mailboxes, start with a dbsizeparam of m6g8XLarge8TB and a redissizeparam of cache.m5.large.
Leave the two params, "ddapikey" & "ddroleexternalid" empty. These are used for opt in enterprise monitoring. Note that even if you discuss monitoring with the Sublime team, you may not be asked to update these fields.
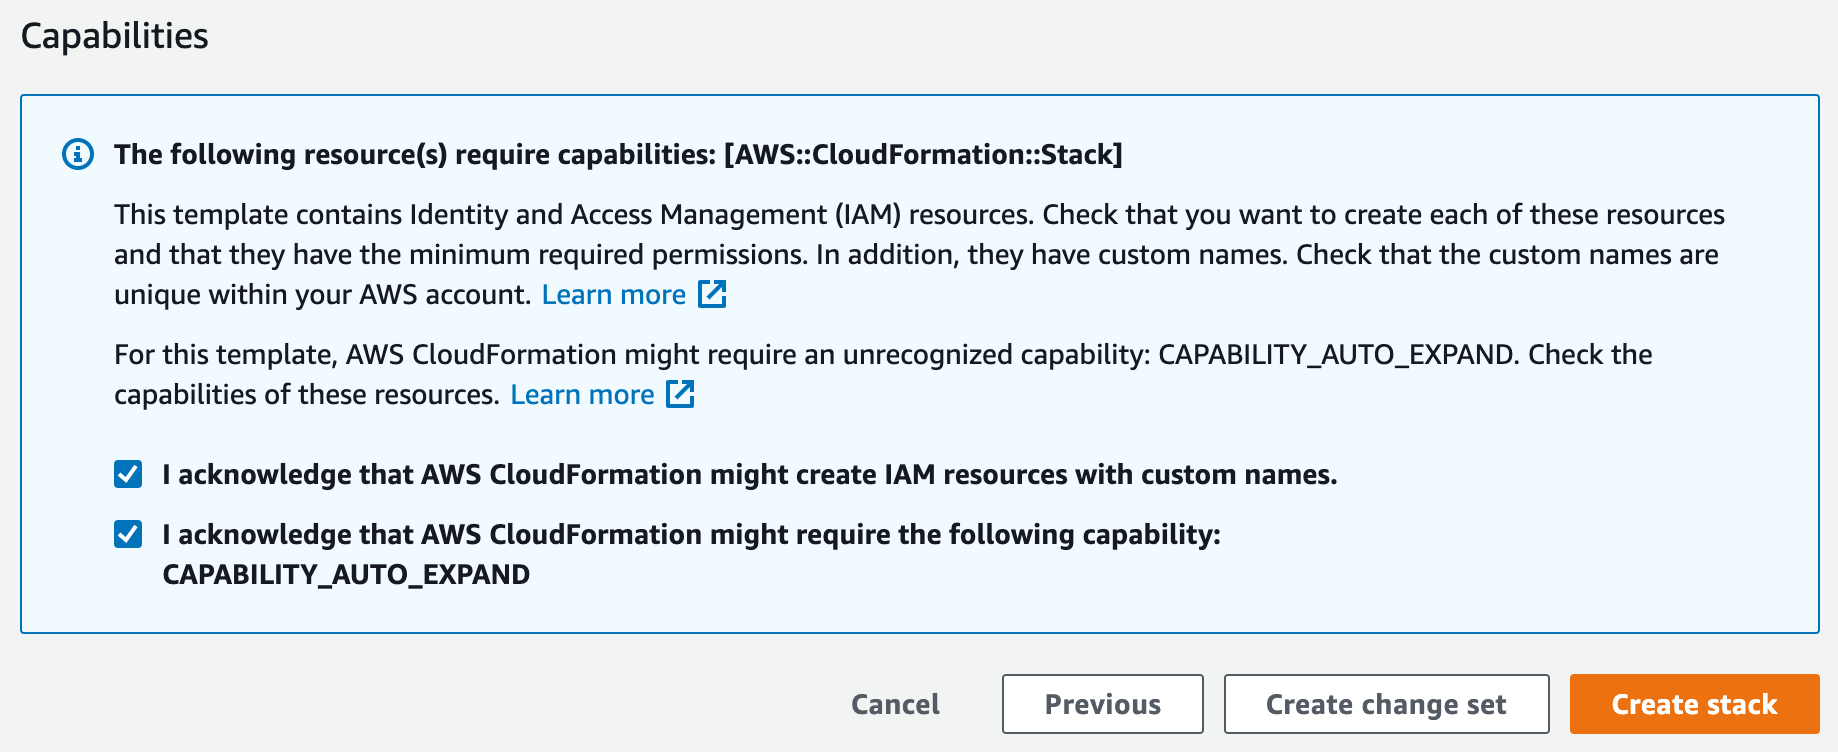
Acknowledge IAM permissions
When you get to the last page in the CloudFormation web app console GUI, right before the orange
Create Stackbutton, please ensure you check the following two IAM permissions. The deployment will fail if you do not check these two boxes. CloudFormation needs permissions to create these IAM roles for the deployment to succeed. Check both boxes.
View Dashboard
- Once the deployment has completed (you should see "CREATE_COMPLETE" on all items under "Stacks"), click the topmost item in the "Stacks" list. It should contain the word "docker" in the name.

- Click the "Outputs" tab and copy the Value ending in "amazonaws.com"

-
Visit this URL in your web browser. You will see an SSL security warning because the deployment uses a self-signed certificate. Click "Advanced" to bypass this warning and visit your dashboard.
- You may setup a custom domain and certificate following these these instructions (this will remove the self signed certificate warning).
-
Bookmark this URL! The Dashboard will guide you through further setup.
Resources deployed
- Virtual Private Cloud (VPC)
- Two Public Subnets
- Two Private Subnets (with NAT Gateways)
- Two Isolated Subnets
- RDS Postgres Database
- ECS Cluster + AWS Fargate containers
- EC2 Instances to support ECS w/ GPUs
- EKS (K8s)
- API Gateway
- SQS
- Elasticache (Redis)
- S3 Buckets
- Elastic File System
- EC2 instance used to generate a self-signed certificate
- Self-Signed SSL certificate that is imported into AWS Certificate Manager (ACM) and Systems Managers (SSM)
- Secrets Manager secrets for Postgres Password and access credentials
- Application Load Balancer that leverages the self-signed SSL certificate
- Internal Application Load Balancer
- Security Groups to restrict access to the infrastructure (only port 443 to the Load Balancer, no access to the RDS databases, etc)
Production Readiness
We advise some additional steps to protect your Sublime Deployment from accidental mistakes.
- Go to RDS in your deployed region and find the sublime instance -- if you have multiple with random names find the one in the
sublime-platform...security group.- Alternatively find the nested CloudFormation stack with
rdsin the name and under resources follow the link associated withAWS::RDS::DBInstance. - Select
Modifyon the DB Instance, go the the bottom and select the box "Enable deletion protection". Continue and you may opt to apply the change immediately (this change won't cause downtime). - If you ever do need to delete this DB instance you will follow the same steps but unselect the box.
- Alternatively find the nested CloudFormation stack with
- Go to CloudFormation and find the "Sublime-Platform" stack.
- Select "Stack Actions" and "Edit Termination Protection". Set this to "Enabled" and Save.
Usage data
Basic information like version, error logs, and high-level usage metrics are shared with the Sublime Team so we can troubleshoot issues, provide support, and make Sublime better for you and the community. You can change these settings in your Account page.
How To Update
You only need to update if Sublime reaches out and asks you. These steps allow you to update your cloud infrastructure, and updates to the software itself are made separately (and automatically). This is a straightforward process with lots screens to click through. If you're unsure of anything please reach out!
- Login into your AWS account and go to "CloudFormation". Find the "Sublime-Platform" stack (there will be many stacks that start with "Sublime-Platform" and include "Nested" -- ignore these).
- If you do not see your stack make sure the region in the upper right is the region you deployed to (a US or EU West region).
- The name may vary depending on what it was set as originally -- "Sublime-Platform" is just our default.
- Selected the "Sublime-Platform" stack and then "Update" in the upper right.

- Choose "Replace Existing Template" and enter the URL below which corresponds to your deployment region:
- us-east-1
- us-east-2
- us-west-1
- us-west-2
- eu-west-1
- eu-west-2
- eu-central-2
- eu-north-1
- ca-central-1
- ap-southeast-2
- us-gov-west-1
- Double check that the URL pasted into shows the same region as the AWS console highlights when you click on the region in the upper right. E.g. if "Virginia" is shown and the drop down highlights
us-east-1thenus-east-1should appear the URL (three times). - Select Next and leave all parameters as is, unless asked to do otherwise, and then Next again.
- If a parameter is blank or you're otherwise unsure, please reach out!
- Ensure "Stack failure options" is set to "Roll back all stack resources" and then select Next.
- If there are issues with a deploy we may ask you to change this, but if set to preserve CF will refuse to deploy certain types of changes.

- Check both of the boxes around permissions at the bottom and select "Update Stack".
- You don't need to wait for the change set to load.
- Occasionally monitor the status of the deploy -- some updates can take hours, others just minutes.
- If the stack update does fail please take a screenshot of the failure under "Events" in the "Sublime-Platform" stack. If it says that a nested stack failed to deploy, include a screenshot of the "Events" in the failed nested stack. We apologize for the issue! CloudFormation is a very sensitive and particular system, as well as being subject to transient issues from an array of AWS services!
Uninstallation
Uninstalling the Sublime Platform and securely wiping all your data is easy:
- Visit AWS CloudFormation in the region you deployed to.
- Click on the
sublime-platformStack, then clickDelete. - Delete the
/sublime-security/self-signed-acm-certificate-for-sublime-platformparameter in the SSM parameter store in your region. - Delete the
example.comcertificate in AWS Certificate Manager in your region. You may need to wait for Step 2 to complete in order to delete this cert. - CloudFormation sometimes fails to delete resources, including occasionally silent failures. Double check:
- EKS for a cluster with "sublime" and/or "strelka" in the name. If present manually delete.
- EC2 check for instances or ASG with "hydra" in the name. If present manually terminate/delete.
- S3 check for buckets "sublime-screenshots...", "sublime-platform-messages...", "sublime-platform-audit...". If present, empty and delete.
Updated 4 months ago